In this two part series I’m going to try my best to describe how I use Apache Ant and Eclipse to write/debug software for the BlackBerry platform.
Requirements
- BlackBerry JDE 4.1+ (or JDE Component Pack)
- Ant 1.6.x+ (if not using eclipse, or your ide does not support ant)
- Eclipse 3.x (or your ide of choice)
- BlackBerry Ant Tools
Prepare your workspace
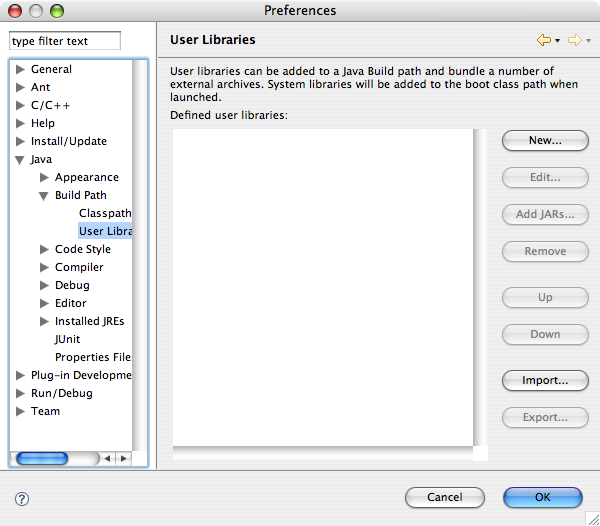
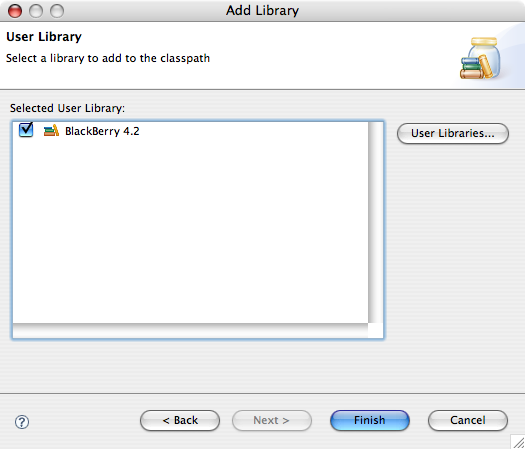
This isn’t necessary per-say but you owe it to yourself. First step is adding a user library for the blackberry api. Go to Workspace->Preferences and drill down, Java->Build Path->User Libraries.
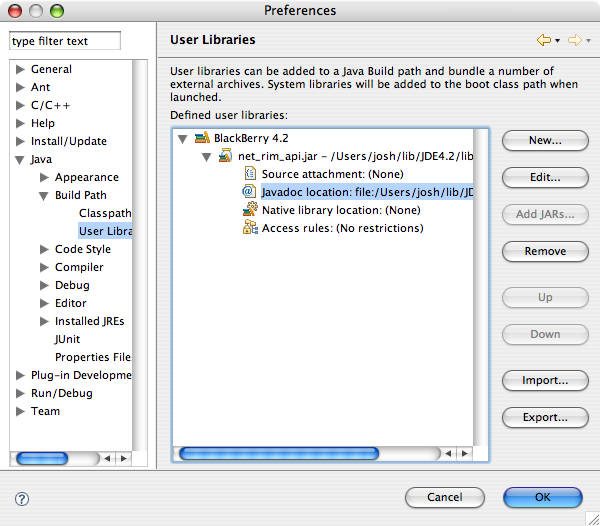
Click New and enter “BlackBerry 4.2” as the library name. Click Add JARs and find your rim api jar JDE_HOME/lib/net_rim_api.jar. Also be sure to set the javadoc location JDE_HOME/docs/api. This will give you documentation popups when you do code assist (ctrl+space) and meaningful variable names when using code generation (eg: abstract method stubs).
Setup ant classpath
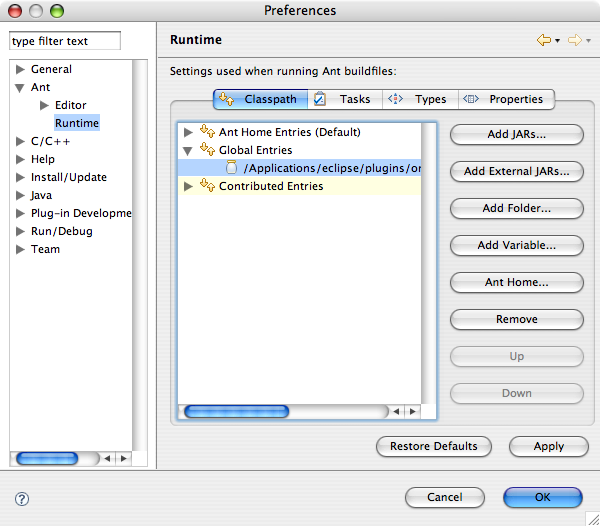
We will be using a set of ant tasks to automate the build process of our application so download the latest version of BlackBerry Ant Tools and extract the zip somewhere. Where you put bb-ant-tools.jar is up to you but I prefer to put it in my ant lib directory eclipse/plugins/org.apache.ant_1.6.5/lib. Go to Window->Preferences and drill down, Ant->Runtime. Click Add External JARs and find bb-ant-tools.jar.
That’s it! The workspace is good to go.
Hello, World!
Alright, now lets get to the soldering! I mean programming (sorry, wrong pass-time). Ever since the first cave man/woman programmer chiseled the first cave program on his/her cave wall it has been a “Hello, World!” program. I don’t know what happens to those who break this tradition and I don’t want to find out.
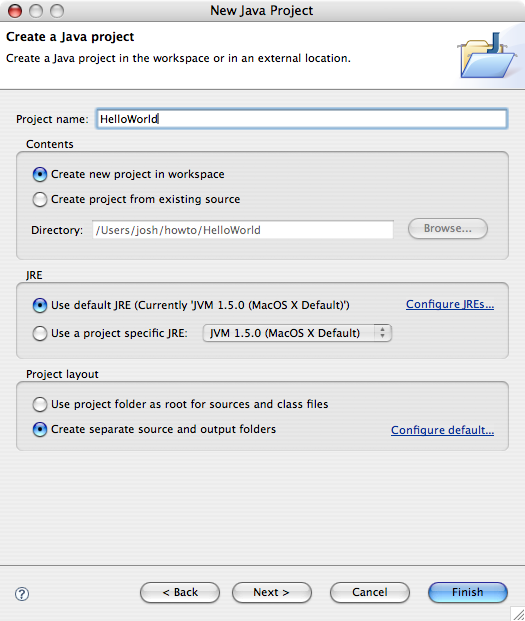
Create a new java project and call it whatever the hell you want, but keep in mind what I just said about “Hello, World!”. Select the option to create separate source and output folders and click next.
In the Libraries tab select the JRE System Library and click Remove. Click Add Library and select User Library and click next. Check the checkbox beside the library we created when preparing our workspace and click finish. Click finish to create the project.
Create the class ca.slashdev.HelloWorldApp:
package ca.slashdev;

import net.rim.device.api.ui.UiApplication;
import net.rim.device.api.ui.component.LabelField;
import net.rim.device.api.ui.container.MainScreen;

public class HelloWorldApp extends UiApplication {
   public HelloWorldApp() {
      MainScreen screen = new MainScreen();
      screen.add(new LabelField("Hello, World!"));
      pushScreen(screen);
   }

   public static void main(String[] args) {
      new HelloWorldApp().enterEventDispatcher();
   }
}
Create the build.xml file:
<project name="Hello World App" default="build">
   <taskdef resource="bb-ant-defs.xml" />

   <!-- rapc and sigtool require the jde.home property to be set -->
   <property name="jde.home" location="/Users/josh/lib/JDE4.2" />

   <!-- directory of simulator to copy files to -->
   <property name="simulator.home" location="/Volumes/Java/JDE4.2/simulator" />

   <property name="src.dir" location="src" />
   <property name="build.dir" location="build" />
   <property name="cod.name" value="ca_slashdev_HelloWorld" />

   <target name="build">
      <mkdir dir="${build.dir}" />
      <rapc output="${cod.name}" srcdir="${src.dir}" destdir="${build.dir}">
         <jdp title="Hello World" />
      </rapc>
   </target>

   <target name="sign">
      <sigtool codfile="${build.dir}/${cod.name}.cod" />
   </target>

   <target name="clean">
      <delete dir="${build.dir}" />
   </target>

   <target name="load-simulator" depends="build">
      <copy todir="${simulator.home}">
         <fileset dir="${build.dir}" includes="*.cod,*.cso,*.debug,*.jad,*.jar" />
      </copy>
   </target>
</project>
IMPORTANT: Set the jde.home and simulator.home properties appropriately.
Show the Ant view by clicking Window->Show View->Ant. Drag the build.xml file into this view. Now you can simply double-click on the targets to run them. This would be a good time to run the build target. No errors? Sweet! Run the load-simulator target to copy files into the simulator.
Debugging
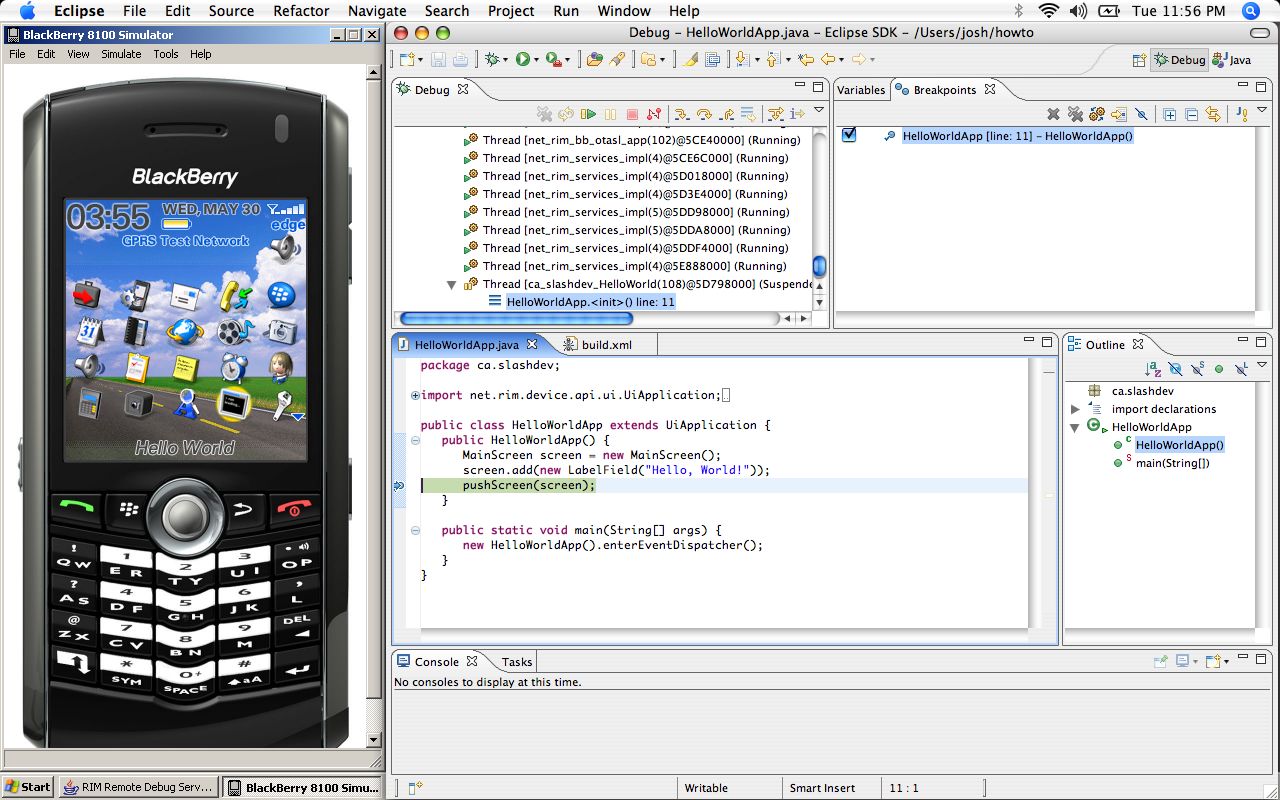
JDE 4.1 and above comes with a tool called JDWP. Start JDWP from your JDE install. Now lets setup a remote debug configuration in eclipse. Click Run->Debug. Select the Remote Java Application category and click the new button. Enter a name for the configuration and select the project. Click Debug and the simulator should spring to life.
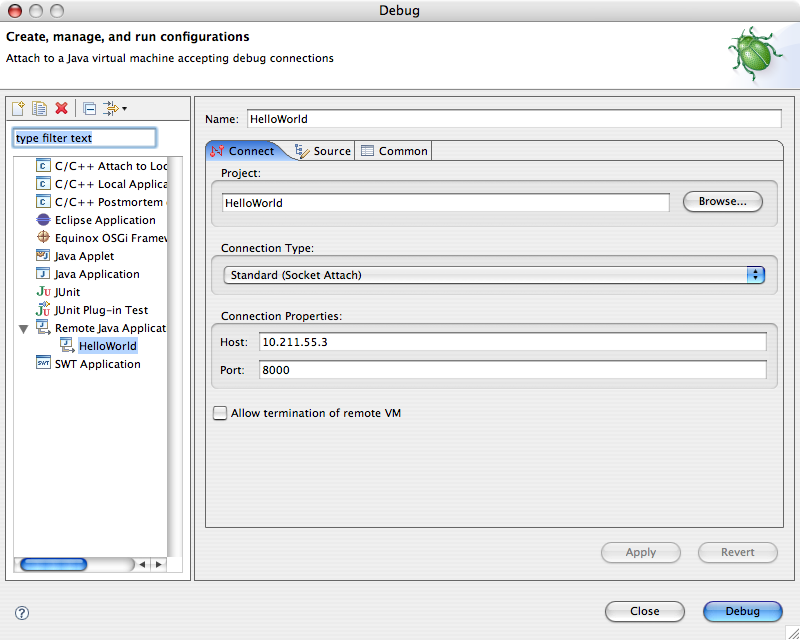
Set a breakpoint at the line where the screen gets pushed to the stack. In the simulator, launch the Hello World application and eclipse should switch to the debug perspective and execution should be suspended at your breakpoint.
Recap
So what have we covered? We’ve added the blackberry api as a user library, installed the blackberry ant tools project and wrote a simple but effective build script. How many applications have you written that are this simple? Probably not many. Lets now look at a more complex setup with dependencies.
Hello, World! with dependencies
If you’ve gotten this far I’m going to assume that I can short cut some of the details now.
Create a general project in the workspace called common. This directory will be shared by all of the projects. Each project will import it’s build script as well as some common properties.
Create a file called build.xml:
xml version="1.0" encoding="ISO-8859-1"
<project name="build-common" default="build">
<taskdef resource="bb-ant-defs.xml" />
<!-- import project properties (project basedir is searched) -->
<property prefix="project" file="project.properties" />
<!-- get common build file basedir and import common properties -->
<dirname property="common.basedir" file="${ant.file.build-common}" />
<property file="${common.basedir}/common.properties" />
<property name="build.dir" location="build" />
<path id="import.jars">
<fileset dir="build/lib" includes="*.jar" />
</path>
<path id="src.files">
<fileset dir="src" includes="**/*" />
</path>
<target name="build" depends="deps">
<mkdir dir="build/lib" />
<rapc quiet="true" output="${project.output}" destdir="${build.dir}">
<import refid="import.jars" />
<src refid="src.files" />
<jdp file="${basedir}/project.properties" />
</rapc>
</target>
<target name="deps" if="project.deps">
<mkdir dir="build/lib" />
<subant target="export-all">
<dirset dir="${common.basedir}/.." includes="${project.deps}" />
<property name="export.dir" location="build/lib" />
</subant>
</target>
<target name="clean">
<delete dir="build" />
</target>
<target name="sign" depends="build">
<sigtool codfile="build/${project.output}.cod"
jdehome="${sigtool.jde}" password="${sigtool.password}" />
<!-- delete that damn pesky log file -->
<delete file="LogFile.txt" />
</target>
<target name="load-device" depends="sign">
<exec executable="${jde.home}/bin/JavaLoader.exe">
<arg value="-usb" />
<arg value="load" />
<arg file="build/${project.output}.cod" />
</exec>
</target>
<target name="load-simulator" depends="build">
<antcall target="export-all">
<param name="export.dir" value="${simulator.home}" />
</antcall>
<copy todir="${simulator.home}">
<fileset dir="build/lib" includes="*.*" />
</copy>
</target>
<target name="export" if="export.dir" depends="build">
<mkdir dir="${export.dir}" />
<copy todir="${export.dir}">
<fileset dir="build" includes="*.cod" />
</copy>
</target>
<target name="export-all" if="export.dir" depends="build">
<mkdir dir="${export.dir}" />
<copy todir="${export.dir}">
<fileset dir="build" includes="*.cod,*.csl,*.cso,*.debug,*.jar" />
</copy>
</target>
</project>
And create a file called common.properties:
jde.java.home = ${java.home}
jde.home=/Users/josh/lib/JDE4.2
simulator.home=/Volumes/Java/JDE4.2/simulator
sigtool.jde = ${jde.home}
sigtool.password = YourPassword
Be sure to set these two properties to values appropriate for your setup. Hint: if you are using the simulator inside the JDE, set simulator.home=$(jde.home}/simulator.
Hello World dependency
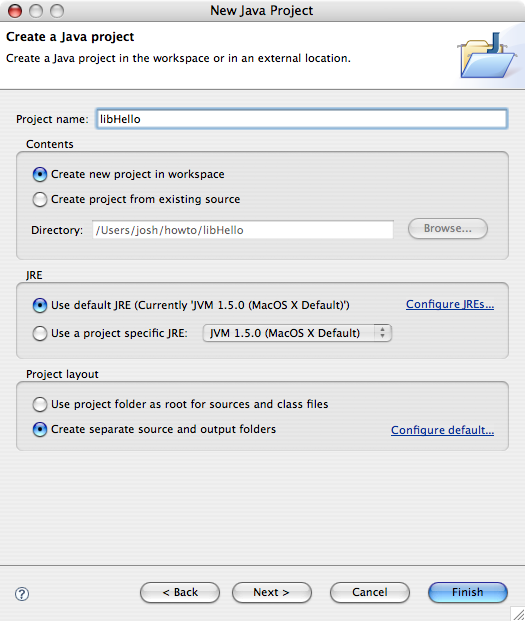
Now lets create a library for our HelloWorld project to depend on. Create a new Java project and call it libHello and be sure to select the option to create separate source and output folders.
For the sake of demonstration, lets create a simple class with a string property that contains the infamous hello world message. Create the class called ca.slashdev.HelloWorld:
package ca.slashdev;

public class HelloWorld {
   private String _message;

   public HelloWorld() {
      _message = "Hello, World!";
   }

   public String getMessage() {
      return _message;
   }
}
Now this is where the magic begins. Create two files in the libHello project.
build.xml:
<project name="libHello" default="build">
   <import file="../common/build.xml" />
</project>
project.properties:
output=ca_slashdev_libHello
title=Hello World Library
type=library
Drag the build.xml file into the Ant view and run the build target. Ooooh, ahhhh. Now wasn’t that easy? Our common build script does all the work, we just give it some properties to work with. The project.properties file contains everything you would normally specify in the project settings dialog in the RIM JDE. Check out the documentation from the blackberry ant tools project for a full list of values that can be specified.
Retrofit Hello World application
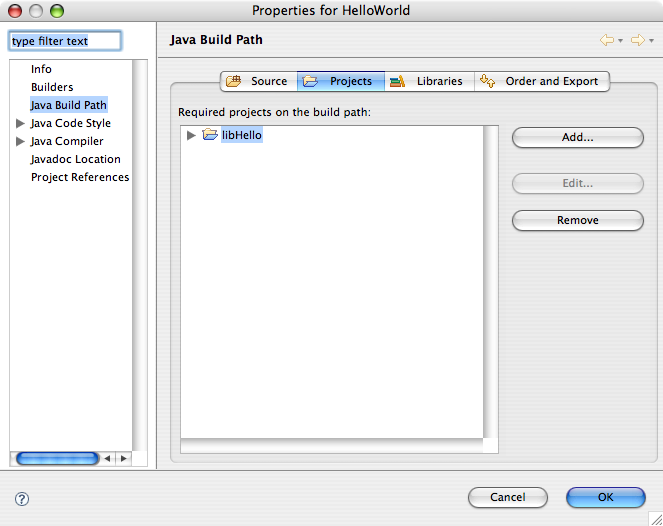
Right click the HelloWorld project in the workspace and click properties. Go to the projects tab and add libHello project to the build path.
Replace the contents of the build.xml file in HelloWorld with this:
<project name="Hello World" default="build">
   <import file="../common/build.xml" />
</project>
Create the project.properties file:
deps=libHello
output=ca_slashdev_HelloWorld
title=Hello World
type=cldc
Change the ca.slashdev.HelloWorldApp class to use the ca.slashdev.HelloWorld class in libHello:
package ca.slashdev;

import net.rim.device.api.ui.UiApplication;
import net.rim.device.api.ui.component.LabelField;
import net.rim.device.api.ui.container.MainScreen;

public class HelloWorldApp extends UiApplication {
   public HelloWorldApp() {
      HelloWorld hello = new HelloWorld();
      MainScreen screen = new MainScreen();
      screen.add(new LabelField(hello.getMessage()));
      pushScreen(screen);
   }

   public static void main(String[] args) {
      new HelloWorldApp().enterEventDispatcher();
   }
}
Now run the build target in HelloWorld project and viola! Just for the hell of it, run the clean target in libHello. Now run the build target in HelloWorld. You’ll notice that the build script automatically builds the dependent library. This is accomplished by setting the deps property; a comma separated list of directory names for each of the dependencies.
Final thoughts
We did it. We compiled, compiled with dependencies, and debugged a blackberry application all without using RIM’s IDE. Compiling is provided by the rapc ant task from the blackberry ant tools project, and no need for .jdp or .jdw files anymore since all module settings are inside standard properties files. Furthermore, I’d like to point out that both examples in this guide can be just as easily built outside of Eclipse. This is an important distinction because I firmly believe that a developer should be free to use whatever tools they are most comfortable with. If that happens to be a standard text editor, and the command line so be it.
The acute observer will notice that all of my screen captures are from Mac OS X. I should point out that the rapc compiler works just fine under OS X and Linux (using blackberry ant tools project). However, I am unaware of any way to run the simulator, sign cod files, or use javaloader natively on these operating systems. Virtualization software such as Parallels provide a less than ideal solution where by you can run your simulator session inside of a virtual machine. This tends to be slow, but works in a pinch. Such is a topic for another post. ;)
John Smith January 17th, 2012
Hello, thanks for your article. I’m very new to blackberry and ant as a whole so please bear with me. I have a standard Blackberry project built with the eclipse plugin. Now I have to make several other builds that use the same code but ONLY different images. Is there I can create an ant script for each of the other projects that’ll only reference the appropriate image folder but still reference the ‘common’ code?
jiGGaK September 5th, 2011
If the output from that error message is to be trusted it looks like there is a newline character after the PIN number. You might want to look at your 9700.sh script to make sure there are aren’t any trailing characters there. Also watch out for ‘\r’ (carriage return) characters that might be left over from the .bat file.
yadavendra September 5th, 2011
I have macpro with Loin OS 10.7
I have done all the stuff worked well but unable to load/run simulator the getting following error
Command Line Error - BlackBerry Smartphone Simulator
----------------------------------------------------
Bad value "0x2100000A
" for option /pin.
Try "fledge /help" for command line help.
Please suggest what to do ..
And I also did I created 9700.sh from 9700.bat
arsenk01 June 21st, 2011
Hi, do anyone know how to import and run linphone sources to Blackberry application?
Euphranor May 4th, 2011
..we are creating an app for blackberry mobile and we are using Blackberry plugin for Eclipse but we find difficulties on editing the graphical User Interface UI…will somebody help us.!!
Anton Weiss November 28th, 2010
hi
thanks for the tutorial. it helped me a great deal. I summarized my own experience automating an Eclipse-based BlackBerry project with Ant here: http://otomato.wordpress.com/2010/11/25/automating-eclipse-based-blackberry-project-with-ant/
Hope it helps someone as well.
jiGGaK March 24th, 2010
Nithya,
Try printing out the jde.home property before the line that failes:
<echo>${jde.home}</echo>
If that yields no luck, please use the forum. Blog comments aren’t really for providing support.
Nithya March 24th, 2010
Hi,
I have done all the steps from the begining. But I am struck when run the common build.xml using Ant. I am getting C:\Documents and Settings\e10074\Eclipse Workspace\common\build.xml:23: jde home must be a directory
this error. But i specified the location of my JDE home in properties file. Can u help me out in this.
Thanks….
Nithya
jiGGaK January 25th, 2010
krishnan,
You must set the jde.home directory in the build script or properties file. The path should be the directory where you copied the RIM JDE.
We also have forums now for discussions such as this: http://forum.slashdev.ca/
krishnan January 25th, 2010
Hi, I got the following error: /Users/xxxxxxx/Development/BlackBerry/SDK/HelloWorld/src/ca/slashdev/build.xml:16: jde home must be a directory
When I complied the code using ant. Please help me .
Ben Clark-Robinson January 18th, 2010
Running Snow Leopard? You can find a Universal preverify at http://developer.motorola.com/docstools/motodevstudio/javame/downloads/
CT October 13th, 2009
I was trying to get the jde.home property set up correctly, but I don’t know what mine should be. I have tried: C:\Program Files\Research In Motion\BlackBerry JDE 4.7.0 which is the location of my file that is equivalent to yours but it won’t accept it. Same thing with my simulator.home I have attempted to give it C:\Program Files\Research In Motion\BlackBerry JDE 4.7.0\simulator but once again it doesn’t like it.
The line it doesn’t like is
specifically the build.dir
Maulik May 29th, 2009
I am running the ant the way you should. Window -> Ant Window
I didnt get the way to run the ant from root of my project. And yes my project has the src directory in it.
jiGGaK May 25th, 2009
Make sure the source directory (src) actually exists. Also make sure you are running ‘ant’ from the root of your project, eg:
$ myproject# ./ant
Maulik May 25th, 2009
Hi, I have problems running the blackberry on MAC OS X using the above methods.
I followed the same procedure as mentioned above but still I am struggling to run the application on the Ant
the console shows me error: src not found I tried changing the src.dir and build.dir in the build.xml but didnot work
Can you please show me how to do this? I am complete newbie to blackberry development.
TrungNguyen May 23rd, 2009
Thanks…i got it :)
TrungNguyen May 23rd, 2009
Hi, thank you so much for your article. I have just enjoyed by installing successfully JDE on Fedora Eclipse.
I just concern one thing that how can i set icon for one App.
I appreciate all your help
Thanks
jiGGaK April 6th, 2009
Aaron,
You need a copy of the JDE directory in order to use bb-ant-tools. Specifically you will need at least net_rim_api_jar, rapc.jar, and SignatureTool.jar. On top of that in Mac OS X you will need a command line tool called preverify. You can find this in the mpp sdk.
BlackBerry_JDE_4.5.0.exe is an installation package. You will need a Windows system to install the JDE. Then you can simply copy the directory over to your Mac OS X machine to get the required files.
There is a way to extract the file on Mac OS X using wine (darwine on OS X) but it haven’t tried this before.
Aaron Ryan April 6th, 2009
Hello
I am really just starting out, and probably jumping into the deep end too quick, but…
How do I “find your rim api jar (JDE_HOME/lib/net_rim_api.jar)” ?
I downloaded the BlackBerry_JDE_4.5.0.exe, but cannot open it? Is there a way to recompile this file for Mac OS X, or extract any .jar contents?
The rest of the tutorial is crystal clear.
Best, Aaron
Uri Peltz April 5th, 2009
Hello First of all great tutorial. I have a question about granting read and write permissions to a midlet. in the apache ant while I use the wtkjad I add the MIDlet-Permissions attribute and values
how do I do it here? Thanks
jiGGaK March 30th, 2009
Hi Stephen,
I’m not sure I understand what your question is. Could you be more specific?
Stephen Rhein March 30th, 2009
jiGGaK, Why is it that expanding then rebuilding the jar allows it to be added to the cod? I’ve tried many other ways to toy with it and yours is the only one that worked. I am relatively new to Ant and would appreciate any explaination.
jiGGaK February 25th, 2009
Nimra,
That’s a typo, it should read Workspace->Preferences
Nimra February 25th, 2009
where is this windows > preference….? i can’t find it! =(
pierre November 19th, 2008
Do you have a trick to manage the resource bundles MyFile.rrh and MyFile.rrh which is accessible from a dynamically created interface (MyFileResource)?
jiGGaK November 7th, 2008
Patrick,
Sorry, I have no idea why that would happen.
I did notice two little toggle buttons in the console window marked “Show console when standard output changes” and “Show console when standard error changes”. In my eclipse, both of these are enabled.
The only thing I can suggest is starting a fresh workspace, and setting up a new project. See if the console is still magically clearing itself.
Patrick Waugh November 6th, 2008
Great tutorial, but I have one problem.
When I dboule click on the “build” task in the Ant View of Eclipse, the console shows some activity, and then clears and terminates the build (presumably because of errors). How can I get it to NOT clear? I find I can run the build with $ant, and see things fine there, and even in cases where it works fine, the console window in Eclipse is mysteriously cleared!
Patrick
MonkeyWrench August 29th, 2008
Thanks jiGGak, I’ll give that a go.
jiGGaK August 29th, 2008
Not necessarily. You might be able to include the contents of the library with your application.
I haven’t tested this, but I think the rapc compiler will accept a jar file. Here is an example build.xml.
<project>
   <target name="compile">
      <javac srcdir="src" destdir="bin" source="1.3" target="1.1" />
   </target>
   <target name="build" depends="compile">
      <unjar src="library.jar" dest="bin" />
      <jar destfile="poo.jar" basedir="bin" />
      <rapc output="your_cod" destdir="build">
         <jdp file="project.properties" />
         <src><fileset file="poo.jar" /></src>
      </rapc>
   </target>
</project>
MonkeyWrench August 29th, 2008
Ok, another quick question:
Am I right in assuming that if I’m using an external library, with no source available, then I’m stuck?
MonkeyWrench August 19th, 2008
Thanks jiGGaK,
It’s fixed now.
jiGGaK August 14th, 2008
You are responsible for creating the dependant COD file. You have two options:
Grab the source for LWUIT and use rapc to build a library COD file.
OR…
Copy the LWUIT source directly into your applications project.
MonkeyWrench August 14th, 2008
Thanks jiGGak.
When you say I MUST have a corresponding COD file to run on the device, does that mean a corresponding COD file is meant to be created during the rapc process, or that I am responsible for creating that corresponding COD file myself?
I’m trying to import the LWUIT JAR. So when I run on the device it complains that the LWUIT module is missing. How do I create the corresponding LWUIT COD file? B/c even though I include it in the import path, their is no such COD file to be found after the rapc process is complete.
Thanks, and apologies if it seems like I’m asking dumb questions here!
jiGGaK August 13th, 2008
What exactly are you trying to import? If you import a JAR file you must have a corresponding COD file to run on the device/simulator.
MonkeyWrench August 13th, 2008
As an additional to my above message, I notice in post 37 you describe the JAR file that rapc creates - it seems all of the classes from my imported library are missing from here also; I hope this provides some clues…
MonkeyWrench August 13th, 2008
Hi jiGGaK,
Thanks for the reply, although I’m still a little confused.
I understand what you are saying about copying all cod files to the simulator - rapc creates six xxxx.cod sibling files all of which I copy to the emulator. There are no yyyy.cod files corresponding to the yyyy.jar that I imported during the rapc process, however. So where should the cod files that correspond to my jar files appear?
Thanks in advance.
jiGGaK August 12th, 2008
Sounds like you have two seperate projects/code modules. You need to copy all cod files to the simulator, including the cod files that correspond to the jar files you listed in the imports list.
MonkeyWrench August 12th, 2008
Hi all,
Thanks for the tutorial. I’m having a little problem with importing jar files when compiling.
Following the documentation I include the import element inside my RAPC call, along with a a location attribute to point to JAR xxxx. The cod files appear to be created correctly and yet when I try to run on a device/emulator it says “Module xxxx not found”. If I check inside the created JAR file, it also seems that the necessary imports are missing.
I’m sure there is a trivial solution, what am I doing wrong?
jiGGaK August 11th, 2008
RAPC will create a JAR file. You can check this jar file to make sure that all the images where included successfully.
How are you reading in your images? You may need to provide an absolute path such as: Bitmap.getBitmapResource("/poo.png");
DKIM August 10th, 2008
Hi, Please help me…
I was able to compile but my application is not working as I want because it can not find image files. I followed the direction as above. However it is not working. where should i put the resources?
I made a reource directory as same level of source directory.
jiGGaK July 23rd, 2008
Chris,
Is it possible that you are building your application as a library instead of a CLDC app or MIDlet? This would cause your app to not appear on the home screen.
Chris July 23rd, 2008
Hi, I am trying to build my application using an ant script similar to the one in your example. Everything seems to build fine and all the files are created and copied over to the simulator directory. The problem is the app doesn’t show up in the simulator and I am not seeing any errors. I’ve also tried to load the app using the menu in the simulator, it attempts to load i think but nothing really happens, no error and no icon.
I am using the latest JDE 4.5 and building in windows.
jiGGaK July 9th, 2008
Chandar,
The ability to pass the password as a command line parameter wasn’t added until version 4.3. Make sure the SignatureTool.jar you are using is from version 4.3 or greater of the JDE.
Chandar July 9th, 2008
Hi ,
I am trying to automate blackberry signing process. I have provided the password as parmater but Iam not able to sign the file.Iam getting an error.
error is as follows:
sign:
  [sigtool] All files must have the extension .cod for them to be accepted.
  [sigtool] Usage: SignatureTool [-a][-c][-C][-s] [-f [-d] inputFile ][-r directory ][-help] ( codFile (codFile) ... | csiFile )
  [sigtool] -p
When I have removed password parameter it just prompts for password and when I type it signing is done. can you please provide any hint that would help me…
Thanks, Chandar
jiGGaK July 8th, 2008
Cliff,
I’m a bit confused. Are you saying that you have setup a development environment on Mac and your resulting COD files are double the size!?! I have a Mac environment too and I don’t think my COD files are abnormally large.
As for the rapc compiler, just use bb-ant-tools. It will make your life easy. If you are the sadist type, and you want to figure out how the rapc compiler works I have some notes I jotted down during development of bb-ant-tools here but I hate to say the notes are a bit cryptic and possibly incomplete.
Cliff July 8th, 2008
I’ve got a build working on OSX using Maven. There’sa an article that tells you how to patch the SignatureTool.jar so that it runs on Linux. (RIM developers hardcoded Windows like backslashes in the path reference constants causing it to break on *Nix.) What I’m really after is the subtle difference between compiling using rapc.jar without Rim’s preverify.exe versus compiling with it. My cod file doubles in size when I point it at my source archive. Any hints or detailed documentation on secret rapc cmd line flags would be nice.
skroll June 10th, 2008
For Mac OS X users, you can get a copy of a OS X native preverify command from the SDK at http://www.mpowerplayer.com/
I just tried it and everything else from this document works with it in /usr/bin
Hope this helps someone out.
jiGGaK May 20th, 2008
I get the same problem consistently, but only when trying to inspect instances of java.lang.String.
There is a trick; add a temporary watch expression that calls the toString() method of the string reference.
BTP2007 May 20th, 2008
Thanks for the tutorial, very useful. I can debug the BB application now but there is a small problem. When i inspect the variable from eclipse, I only get the ID not the valuable. (ex: Id=”10909021”)
Any ideas?
Sjeps May 9th, 2008
Ignore me, everything is working now thanks… I had some code which throws a RunTimeException if a method hadn’t been implemented later down in a class hierachy… it was throwing and causing the BlackBerry to display the message.
Sjeps May 9th, 2008
Thanks for the quick reply, that is exactly what I have in my main() method, but it is still throwing an uncaught exception saying I must define an application entry point. That is why I was assuming it was some arguement I needed to pass to rapc that I wasn’t
    public static void main(String[] args) {
              test = new TestApp();
              test.enterEventDispatcher();
    }
jiGGaK May 9th, 2008
Sjeps,
Here is an example of what project.properties should look like for a typical CLDC application.
type = cldc
title = Hello
vendor = Josh Kropf
version = 1.0.0
desc = Hello World Program
When you are building CLDC applications you don’t need to set the entry point. Simply extend UiApplication and enter the event dispatcher in the main method.
public static void main(String[] args) {
   new HelloApp().enterEventDispatcher();
}
Don’t forget that if you are using a CLCD application you must use BlackBerry Ui framework. You can not mix MIDP and BlackBerry Ui components.
Sjeps May 9th, 2008
Thanks for the tutorial, very useful, I can get a MIDlet working without problems. However, when I try and make a simple CLDC application, I always get an error about entry points, and I can’t see how to specify the entry point. It might be really obvious as I can see the entry point part in the bb-tools tasks source.
I basically have an app that wants to sit in the background so I can swap the icons when the user rolls over it. In place of a MIDlet class I have a UIApplication with the main(String[] args) method in. Compiles/RAPC’s without problem just when it is on the device is complains there is no valid entry point.
Here is the rapc part of my build script;
Any help much appreciated.
jiGGaK March 16th, 2008
Navneet,
In order to debug you have to first be sure simulator.home property is set correctly and then run the load-simulator target in the ant script. This copies the compiled cod files to the simulator directory.
Then follow the instructions in the guide for starting JDWP and configuring eclipse to launch the simulator.
Navneet March 14th, 2008
Hey Thanks :) but i m have 2 problem
- problem as this webpage i have configare the Eclipes and also Bulid the HelloWorldApp but this bulid.xml is making Cod file but not starting stimalator, thus for that i have to manually go to the path of stuimator and start it and the open the file .cod form option. please let me know what should be the problem
- for debugging it is give me error as remote to vm not connenting
Sorry for bad English.[:)]
rory February 29th, 2008
This was very helpful, thanks.
One thing that is bugging me is that code-assist does not work 100%. In normal Java code I can type the first few letters of a class name that is on the classpath and have Eclipse add the import and complete the class name. However, this doesn’t seem to work with the JDE classes. I have to manually add an import and also fully type the classname. At that point, I can get method suggestions for that object. I’ve tried this on Eclipse 3.2.1 and MyEclipse 6.0.
Any ideas what I might be doing wrong?
Xavier February 26th, 2008
Thanks for the tutorial and the ant tools. Work great.
I’m having problems with the code completion (ctrl+space) when inside a class tha extends another.
Sample:
public class TestScreen extends MainScreen {
 public TestScreen() {
  Te(*)
  }
}

Ctrl.+space at (*)doesn't show up anything,
while at:

public class TestScreen /*extends MainScreen*/ {
 public TestScreen() {
  Te(*)
  }
}
it does show net.rim.device.api.ui.component.TextField and more…
Anything I’m missing? I tried to clean up the net_rim_api.jar leaving just *.class inside, but still the same.
Cheers, Xavi
yuri January 18th, 2008
I found a way :)
You just need to copy the resources temporarily to the output folder, and delete them after the build is over. The key is that the resources must be in the working folder of the compiler.
jiGGaK January 18th, 2008
Yuri,
I’m afraid the rapc compiler will always ‘flatten’ the directory structure for your image resources inside the cod file.
I have no idea why it does that (maybe to make resolving of images more straight forward?) but I haven’t been able to figure out a way around that.
yuri January 18th, 2008
Hi, Great tutorial!
I got this to work on Fedora 8, but after the build is over I noticed a problem: all resources are saved in the root of the jar, their paths are gone. Is there a way to preserve the paths?
jiGGaK January 17th, 2008
Stu,
I’ve updated bb-ant-tools to automatically add the JDE’s bin directory to the PATH temporarily. This fixes the most common problem people seem to report with the rapc task.
You can get the latest build from the project page on sourceforge.
I also updated the install section of the webpage to mention that the JDK’s bin directory must in the path.
Stu January 17th, 2008
jiGGaK,
Thanks for the info. I think the problem I was hitting was that rapc could start off fine (i.e., bb-ant-tools was okay to get it going without the Rim JDE included in the PATH… jdkhome was sufficient), but when rapc goes to call preverify the path to preverify was not available. THis is just a guess.
I’ll stay tuned.
Stu
jiGGaK January 17th, 2008
Stu,
You’re right. It’s not very clear that the environment variable update is necessary, and I have not included that step in the instructions (neither on this site, or the BB Ant Tools project).
Today I will have a look and see if I can make the RIM JDE bin directory automatically discovered in the rapc ant task.
But I am afraid that the Java JDK bin directory will always need to be in the PATH variable.
Watch this site and the bb ant tools project for an update in the next few days.
Stu January 16th, 2008
I’ve been muddling about tryign to get this to work for myself for 3 or 4 hours now. It may have taken less time if I could have gotten over the fact that modifications to PATH/JAVA_HOME environment variables, etc. was a necessary step (I thought “surely I don’t need to get down to the environment variable level to make this work?!?”). Turns out, I did.
Here is the additional step I to make it work:
Added the RIM JDE bin directory and JDK bin directory to my PATH environment variable.
My question is, shouldn’t those things have been setup during installation, or shouldn’t there be a way for me to get the Eclipse build environment to know where the RIM JDE bin directory and JDK bin directories are? This way I could have different project types use different JDE bin directories.
jiGGaK January 6th, 2008
Albert,
You will want to put preverify somewhere in the execution path. An easy way would be to copy it to /usr/bin.
$ sudo cp preverify /usr/bin
I prefer to put this in a local bin directory under my home directory. Open Terminal.app:
$ mkdir ~/bin
$ cp path/to/preverify ~/bin
Then you have to modify your PATH env variable in your profile using your favorite text editor. If you like vi:
$ vi ~/.profile
Put this line in the file and save: export PATH=~/bin:$PATH
Albert January 6th, 2008
Hi. Thanks for the turorial. I’m trying to build on OS X and I get the error:
build:
    [mkdir] Created dir:
.../build
     [rapc] Compiling 10 source files to ca_slashdev_HelloWorld.cod
     [rapc] I/O Error: preverify: not found
Can you give me a step-by-step description where to put preverify? I’ve got the preverify-tool from mpowerplayer.com
FJ December 11th, 2007
An excellent tutorial, now I’m free from the RIM JDE, well worth the extra time to set this up in eclipse. I got a bit stumped on the compilation phase with a rapc CreateProcess: verify … error=2 issue. I had to add the JDE bin directory to my path environment variable. You may also encounter a similar issue with javac, just make sure your jdk bin directory is also on the path environment variable.
Thank you
jiGGaK December 7th, 2007
Danny,
I’ve had mixed success when debugging applications compiled with a version of rapc that differs from the version of the simulator so the only thing I can think of is if you have compiled with 4.2 use the 4.2 simulator.
Also be sure that you have copied over the .debug file along with the .cod file. The JDE will copy a whole bunch of files over so if you want to be extra safe copy the same set of files (the set of files are defined in the build script in the examples).
Apart from that, I guess make sure you are using a recent version of eclipse… that’s all I can think of.
Danny December 7th, 2007
Everything works except for stopping on breakpoints. Eclipse attaches fine and I can suspend the whole simulator. It just won’t stop on any breakpoint. Any thoughts?
Mark Hillsdon October 11th, 2007
thanks jiGGaK, We have the COD being created on the server using just the JDE / JDK. I have not worked with or used Ant as yet. The COD is created on the server but fails to run on the BB..
We want to add some custom parameters to the JAD such as:
setting-phonenumber: [value]
settings-name: [value]
The idea is that the user would not need to edit these details themselves and we can preconfigure the package on the server.
This works fine on a non BB device and these values are passed and used in the installation of the JAR [i.e. they can then be found in the settings section of the app]. On BB - these value are ignored unless present in the JAD before creating the COD.
thx for the feedback - all good stuff.
jiGGaK October 9th, 2007
Major,
What kind of paramters do you need to pass to the COD file? As far as I know when compiling a COD file from jad/jar there are no parameters that affect the way the COD file is built.
Then again, I’ve been wrong many times before :)
If you want to do batch compiling on Linux, you will need:
- Apache Ant
- Java JDK
- Copy of JDE 4.1+
- Important the preverify command
That last point is important. The rapc compiler will call this preverify during the compile process. You will find this command in the Sun Wireless Toolkit, or you might find it somewhere on the net if you Google around a bit.
Anyway, once you have all that just use your favorite web scripting language to launch a non-interactive shell to compile:
cd /your/project/dir & ant build
Major October 4th, 2007
This is great. Really - love it
My BIG question… I have a jad/jar that converts to COD no probs. However I need to do this in real time on a Linux web server [just the conversion] using rapc. I need to do this as there are parameters we need to pass the installer from the original JAD.
How can we do this? Thx and well done again.
jiGGaK September 22nd, 2007
Salvador is correct. JDE is not available for Linux. However, if you are able to get yourself a copy of the installed JDE you can use the rapc compiler on Linux or Mac OS X.
Salvador September 21st, 2007
The first required software “BlackBerry JDE 4.1+” is not available for linux. Be sure you have Windows.
Alex June 25th, 2007
Here I got a job for you - be a ‘Teacher’. Put all this stuff to some actual use. I am sure there alot of people who would benefit from this. And you would feel great for doing it.
:)
Comment submitted